As part of the research for my Spencer Fellowship, I’m trying to track as many of the financial, political, and social networks in ed-tech as I can. (I’m casting the net wide at first, but my project will surely narrow as I progress.)
I’m using a variety of digital tools to do this, but relying heavily on GitHub Pages (which I already use to manage all my websites and projects) and Google Spreadsheets. This walkthrough is as much to remind me how this process works as it is to help others.
What You’ll Need
- a GitHub account
- the desktop version of GitHub
- a Google account
- a text editor (I use Sublime Text; also recommended: Atom, which is built by GitHub)
Step 1: Create a GitHub repository

I’ve created a repo to track data about the Emerson Collective, a venture philanthropy firm founded by Laurene Powell Jobs, Steve Jobs’ widow.
When you create a repository, you can choose the license. I always add a README to my repository.

Step 2: Add GitHub Pages to the repository
Go to Settings

Scroll down to the GitHub Pages settings. Change the Source to “Master” and hit “Save.”
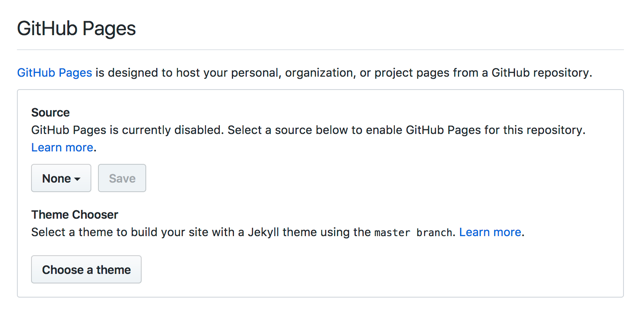
Then choose your theme. Yes, they’re all ugly.

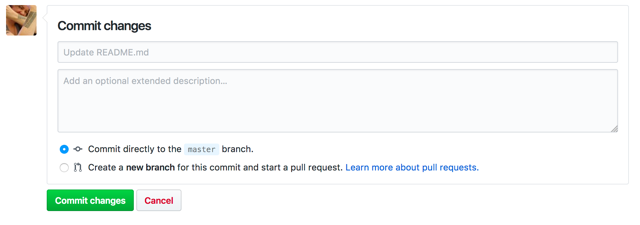
The addition of a theme is going to overwrite anything you put in the README file. So you can update this and then “Commit changes.”
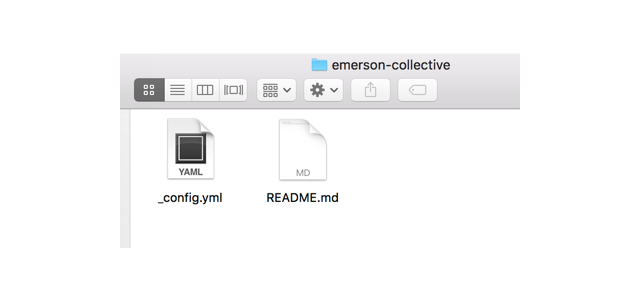
Step 3: Move the files from the repo to your desktop
There are several ways in which you can make “commits” to GitHub – through the browser, through the command line, through the company’s desktop app. I use the latter.
There are also several ways that you can get a copy of the files in a repository from GitHub onto your local machine. You can download a copy from within each repository. Or you can use the desktop app to clone the repo locally.

The folder on your computer will contain two files: _config.yml and README.md.
Step 4: Create a Google Spreadsheet
The Google Spreadsheet is going to work as the database, of sorts, for this project. All updates to the data will take place in the spreadsheet, and through a couple of pieces of code, the GitHub repository will then be updated. (This can be scheduled to happen programmatically, or you can just do this manually. I do the latter.)
Each tab in your spreadsheet will be used to create a YAML file – a human-readable data file. I recommend lower case names for the tabs. Use hyphens if you want the name to be more than one word. The top row in each tab will dictate the data structure.
As you can see, my Emerson Collective work will look at people:
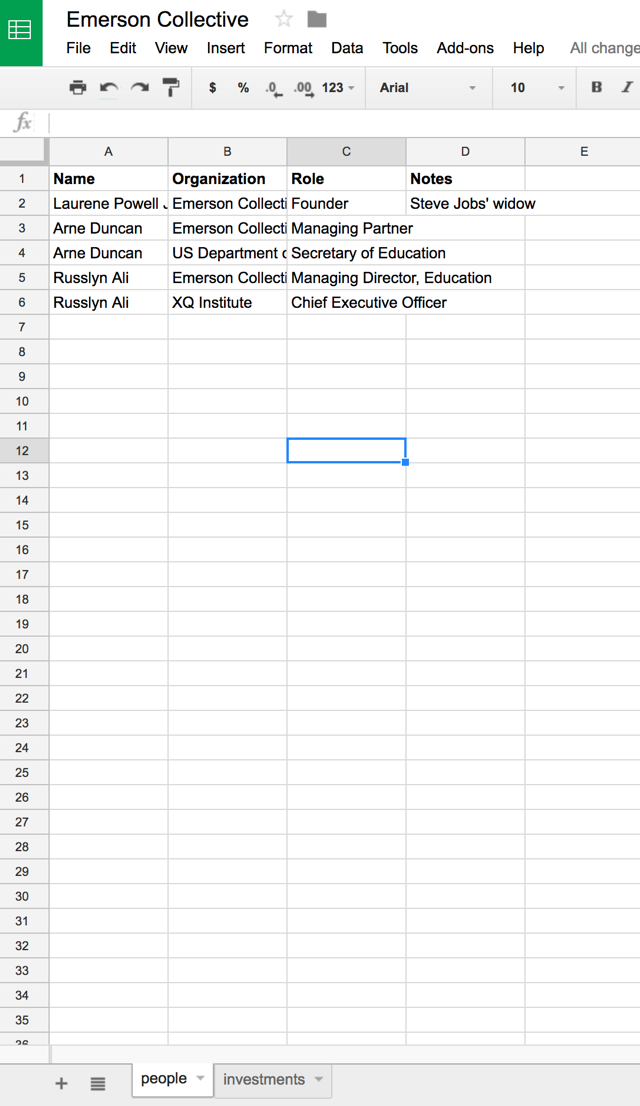
…And investments:

Step 5: Make the spreadsheet public
Under File, choose to "Publish on the Web."
This won’t allow anyone else to edit the document. But it will provide a JSON representation of its contents, which means you can program against it.

Google gives you the link to your spreadsheet. Copy that down somewhere. If you look at the URL in your browser, you can readily see what you need to know: there’s lengthy string of characters after docs.google.com/spreadsheets/d/ and before /edit. That’s the sheet ID.
Step 6: Set up the code for your Google Spreadsheet to integrate with your GitHub repository
So here’s one of the things I love about GitHub and why I use it for all my projects. You can really easily copy files from another project into your new project, so you don’t need to write anything from scratch. You mostly need to edit a few lines in various files. And because the files on GitHub are openly available, you can also download or fork repositories.
Copy all the files from one of my data projects – there’s a long list at Hack Education Data – into the local folder that contains your project. Don’t worry. Nothing will change on GitHub until you sync what’s stored locally with what’s stored on GitHub. And you can always revert back to earlier changes. (Another huge benefit.)
Here I’ve copied all the files from my work on the Chan Zuckerberg Initiative because the data structure for the project is almost identical. In that project too, I had two tabs in my Google Spreadsheet – one for people and one for investments. If your tabs have different names, you’ll need to rename the files inside the _data folder.

Open up all the files in the folder in your text editor. Mostly, you’re just going to have to make a bunch of small changes to each file – changing headers, in my case, from Chan Zuckerberg Initiative to Emerson Collective.

There’s a lot more explanation required to explain how Liquid works. That's the code you see in the image below.

This is the markup language that’s used to build sites using the data in the _data folder. But I think you can see a bit of the logic here. The variable “investments” draws on the data in the site.data.investments file. The data is going to be sorted by “Name.” (Note: “Name” is capitalized in that column in my Google Spreadsheet.) And for each record – “investment” – display on the page the investment.Name, Investment.Date, and Investment.Amount. (Also note: these are also capitalized.) These are displayed as a list, but you can change the HTML to suit your needs.
You'll need to change data in the _config.yml file.

You’ll need to add the sheet ID from your Google Spreadsheet. (Remember that? You wrote it down, right?) That’s the integration_spreadsheet_key. Make sure your GitHub user name and the name of the repo are correct too.
Step 7: Sync your data with GitHub

This step takes your local files and pushes them to your repository on GitHub.
If you get errors at this point (that is, if you get an email from GitHub telling you your page won't build), there’s probably something wrong with the Liquid. That’s where I’d start the troubleshooting.
Step 8: Create a personal access token
You’re going to need to create a personal access token on GitHub because you’re going to pass a command for Git (that is, to update your GitHub repository with the Google Spreadsheet data) over HTTPS.
You’ll find this option on the left hand side of the Settings page if you go to your GitHub profile.

Give the token a description and define the scope of how it will work.

Keep this token a secret. Do not include it in your code anywhere that you post publicly. (That is, don’t include it in a GitHub repository.)
Step 9: Integrate your spreadsheet data
Updating your GitHub repository with your spreadsheet data is going to happen via a URL. Obviously, update the URL below with the correct data.
https://[your GitHub name].github.io/[the name of your repository]/pull-spreadsheet/?key=[spreadsheet ID]&worksheet=[name of the worksheet]&token=[your GitHub personal access token]&org=[your GitHub name]&repo=[the name of the repository]&branch=master
I always open the browser console to make sure the code has run correctly.

You can double-check and make sure the YAML file has been updated successfully. Ideally if there are errors, the console will help you troubleshoot them. (I have found that sometimes characters like accents throw errors at this stage.)
The repository on GitHub will now be updated with the new spreadsheet data. You will need to sync the repo locally to update the files on your machine.
The URL for your project will be [your GitHub username].github.io/[repo name]. In my case, this project is available at hack-education-data.github.io/emerson-collective.
